
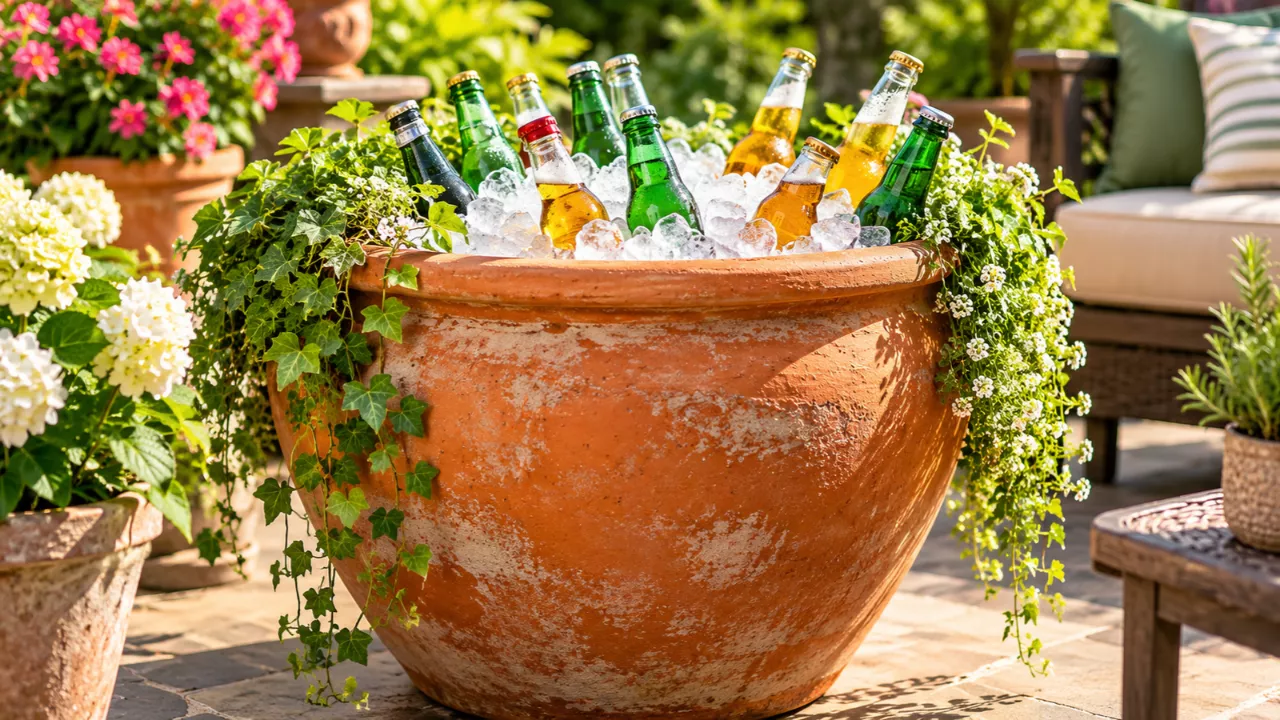
Most of us have a stack of chipped or faded clay pots tucked behind the shed, too good to bin and too tired to plant. A terracotta pot beverage cooler gives them a second life. It looks like a rustic garden feature, and it keeps bottles and cans cool without a bag of ice or a plug-in fridge.
The idea comes from the traditional “pot-in-pot” or zeer pot, a long-used method for keeping food and drink cool in hot, dry regions. The cooling comes from evaporation. Terracotta is porous, so moisture slowly seeps through the clay and evaporates from the outer surface. That evaporation pulls heat away from the inner pot, much like sweat cools your skin. It won’t replace a proper cooler for a big party, but for a few drinks within reach of your seat, it’s a charming and low-cost option.
What You Need to Build It
You can put this together in under an hour with mostly inexpensive supplies. The most important rule is to choose two pots of different sizes, so the smaller one nests inside the larger with an inch or two of gap all the way around.
- Two unglazed terracotta pots with drainage holes. Glazed or painted pots block the evaporation that does the cooling.
- Clean, coarse sand, enough to fill the gap between the pots plus a base layer.
- Something to plug the drainage holes, such as waterproof tape, a cork, or a dab of silicone. Plugging the holes keeps the sand from escaping.
- A raised base, such as two bricks or a plant stand, so air can circulate underneath.
- A damp cloth or towel to drape over the top.
- A watering can or jug for wetting the sand.
- Optional decorative stones or glass beads to finish the top layer.
If you’re reusing old pots, scrub them first and let them dry. Residue from past plants or fertilizer is better off outside your drinks area.
Step-by-Step: Building Your Pot-in-Pot Drink Cooler
- Seal the drainage holes on both pots, inside and out, so sand stays put.
- Set up the base in a shaded, breezy spot. Place the bricks or stand on level ground and rest the larger pot on top.
- Add a layer of sand to the bottom of the large pot and press it flat so it covers the hole.
- Nest the smaller pot inside, keeping the rims level with each other.
- Fill the gap with sand all the way to the rim, packing it gently as you go.
- Soak the sand thoroughly with water, top up with more sand if it settles, and wet it again.
- Add your drinks to the inner pot and cover the opening with a damp cloth.
Every day or so, re-wet the sand. As long as it stays damp, the cooler keeps working. If it dries out, the cooling stops.
Where This Cooler Works Best (and Where It Doesn’t)
Evaporative cooling depends heavily on the air around it. The drier and warmer the air, the faster moisture evaporates and the more cooling you get. In humid weather the air is already holding plenty of moisture, so evaporation slows and the effect is much weaker. Placement matters too, and a shaded spot with moving air will always beat a sunny, sheltered corner.
| Factor | Best Conditions | Poor Conditions |
|---|---|---|
| Climate | Hot, dry air | Humid or rainy weather |
| Location | Shade with a steady breeze | Direct sun, enclosed corners |
| Pot material | Unglazed terracotta | Glazed, painted, or sealed pots |
| Sand moisture | Kept evenly damp | Left to dry out |
| Airflow underneath | Raised on bricks or a stand | Sitting flat on a solid surface |
| Best use | A few drinks for a few hours | Large-batch party cooling |
Treat the result as “noticeably cooler than the surrounding air,” not “ice-cold.” Pre-chilling your drinks in the fridge before they go in will help them stay cold longer.
Tips to Make It Look as Good as It Works
Part of the appeal here is style, so it’s worth a few finishing touches. A layer of smooth pebbles or glass beads over the sand hides the rough fill and gives the top a tidy, polished look. Setting the cooler on a small wooden crate or a rolling plant stand makes it easy to move around the patio. Keep the outer pot unpainted so it can breathe, but you can add a decorative tray or a pretty linen cloth on top.


A few habits keep it working well:
- Rinse the pots and sand at the start of each season.
- Empty and dry the cooler before storing it, especially if you live somewhere with freezing winters, since soaked clay can crack in the cold.
- Keep it away from walls and corners where air can’t circulate.
- Use it on a surface that can handle moisture, as damp bases can stain wood or pale stone.
Frequently Asked Questions
Does a terracotta pot beverage cooler really work without ice?
Yes, through evaporative cooling, but it chills drinks relative to the surrounding air rather than turning them ice-cold. It performs best in hot, dry conditions with some airflow.
How long does the cooling last?
It lasts as long as the sand stays damp. Check the moisture daily and re-wet it as needed. In hot, dry weather the sand dries faster, so you’ll need to top it up more often.
Can I use glazed or painted pots?
It’s not recommended. Glaze and paint seal the surface, which blocks the moisture movement the cooler relies on. Plain, unglazed terracotta is the right choice.
Is it safe to put drinks directly into the pot?
Sealed cans and bottles are the safest choice. Wipe them off before drinking, and avoid placing open containers or unwrapped food inside the pot, since the surface stays damp and can pick up dirt.
1 thought on “Why a Terracotta Pot Beverage Cooler Deserves a Spot on Your Patio!”
Comments are closed.